|
After spending last week clearing the site, we began learning how to begin excavation. Professor White explained the paperwork needed and the proper way to bag anything we find in the field. We were broken into groups and assigned a unit. Within the unit, we were instructed to begin working on a 1 meter by 1 meter quadrant in this unit. Professor White had set up an elevation datum, and we were instructed to bring this square down to 40 cm below that point. Our square’s starting elevation varied between 30 cm and 33 cm. After marking our square, we used shovels to break ground. Grass and roots made this work difficult. Anything that was removed from the square was placed into a large bucket to be screened. Plywood was placed at the edges of the excavation sites to help protect the walls. The walls are fragile and could crumble if stepped on. 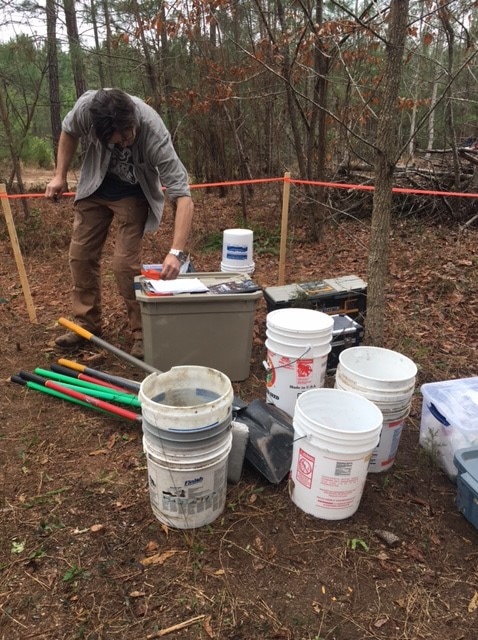 Professor White explains paperwork. 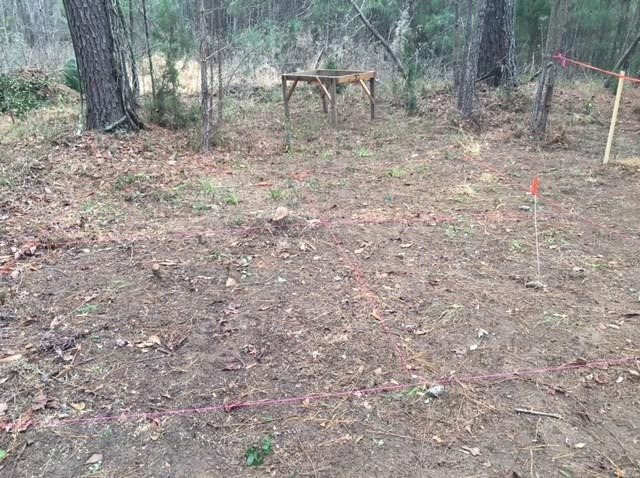 2m x 2m units before excavation. Unit 5 is in the bottom left corner. Our group found it easier to rotate between shoveling, measuring, and screening. The thickest root in our square was approximately 2 cm, and slowed us down quite a bit. We checked frequently to see if the floor of our square was at 40 cm, and then attempted to flatten it as best we could when we were at the proper level. When this square was completed, we started work on the northern adjacent square. This square was not completed by the end of the day. There is a large stump in the unit north of this square, and another on the west side. These meant very large roots that were too large to be removed with hedge trimmers. However, small roots could be just as troublesome at this level. 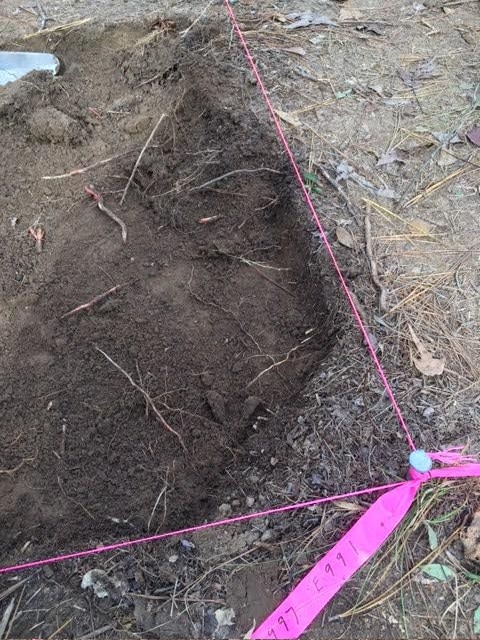 Roots in the shallow soil. A balk is left around the corner nail to give it stability. 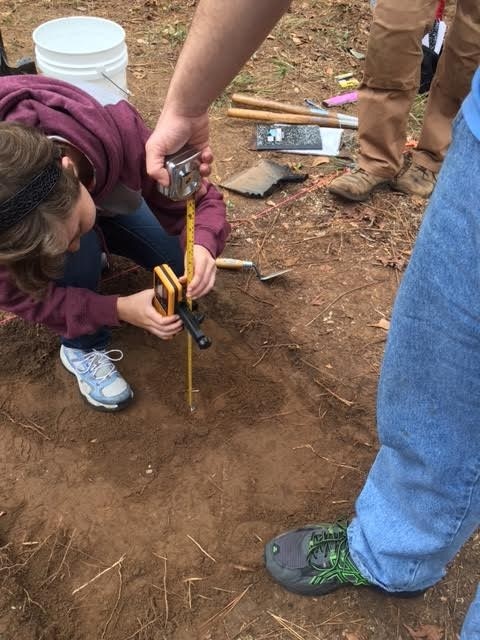 Sam C. and Shane measure the elevation with a laser level and measuring tape. Sifting the dirt that was removed from the square may have been the most calming job on the field site. We were instructed to keep anything that was not organic. We found several rocks and placed them in a pre-labeled field specimen bag. Our northeastern square also contained a modern rusted metal object of some sort near the area of the large stump. Most of what was screened out was organic material, roots and leaves, because we are working so close to the surface. 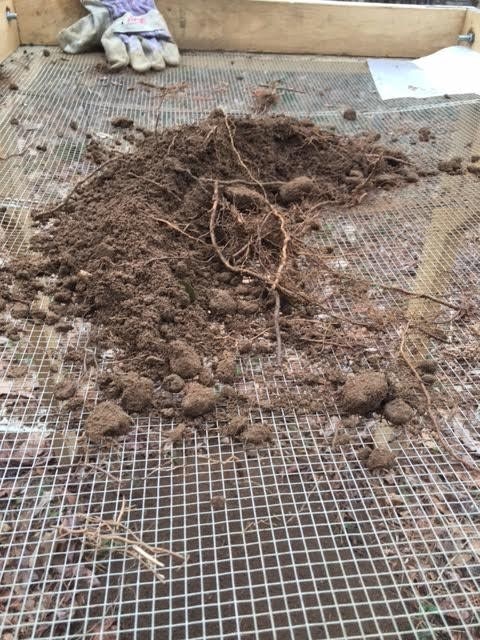 ¼” mesh screen used to sift the buckets of dirt that came out of the squares. 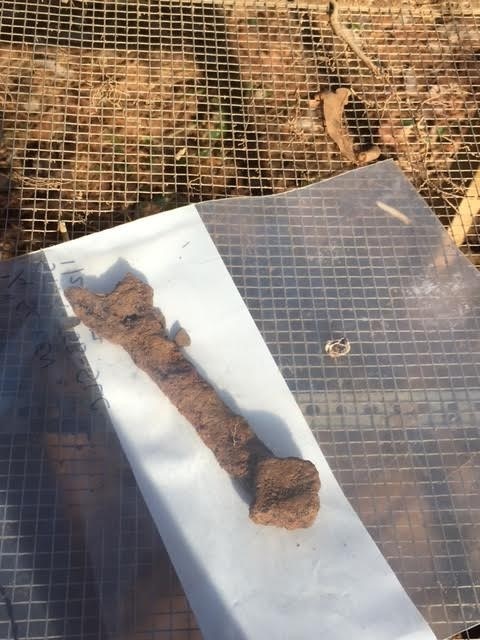 Rusted metal object found in Level 1 of Unit 5. Paperwork was done to go along with all of this. Each 1m x 1m square was assigned its own form. We record things like starting and ending elevation of the four corners and the center,, a map of the floor, and a detailed description of the soil. These forms are important for tracking everything that comes out of the ground, and even the soil itself. This is necessary because this work can never be done again: when the soil is removed, it can never be put back. These records will be vital to future scientists learning about the site long after the work has been done. 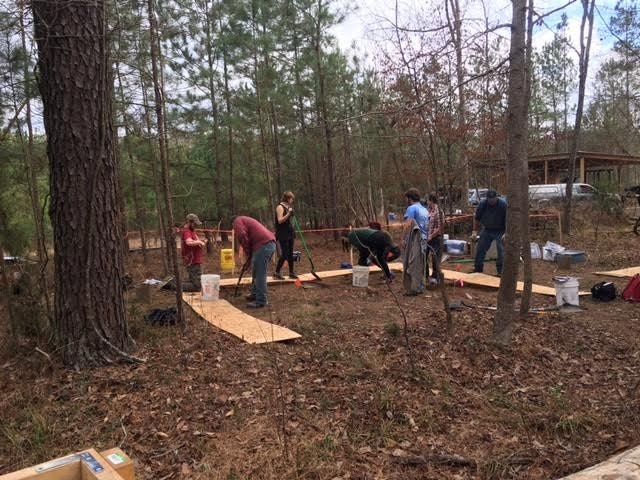 Work in progress on three of the four 2m x 2m units. 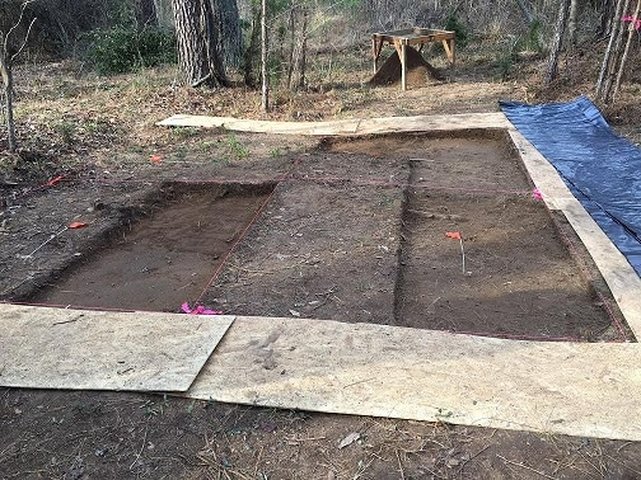 The end result of the day’s work. When we're not working, the area is covered with plastic to give it some protection.
0 Comments
After a week we finally returned for the second day of our field school. During our first visit to the site we had cleared out brush and leaves so that we could set up units, and created a map of the site. Now our second day was beginning and we were actually going to begin digging. We split into three separate groups, one would each take a different 2m x 2m unit. My group and I were assigned to Unit 4. Dr. White decided that we would begin our digging using arbitrary levels. This means that he would set the depth that we were to dig to based up on his own decision and not based upon the stratigraphy. It was decided that we would be digging to 40 cm below our elevation. We figured the distance that we would need to dig down by using a laser level set at the known elevation so measure on a ruler how far below that known elevation we were. Because the laser level is above ground that meant that the ground was already quite close to being 40 cm below the known elevation. For our unit we only needed to dig down about 8-10 cm. 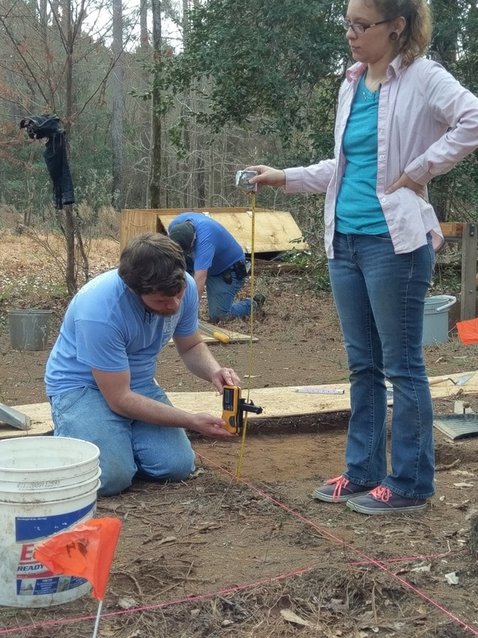 Using the laser level to find our elevation. After filling out the necessary forms recording all the starting information for our unit we began very carefully to start to scrape off the first level using shovels. We split our 2m x 2m unit into four 1m x 1m units, and excavated each one individually. This proved to be no easy task, as we didn’t want to dig to deep. Once we were close to the appropriate depth we would use trowels to clean up the edges of the unit so that they were straight, and to take off the last little bit to get to 40 cm. Once we had our first 1m x 1m unit done we placed plywood along the outside of the unit to protect the walls. The hope is that we will be able to keep the walls intact throughout the semester. Throughout the course of the day our group managed to finish the first levels of two of our 1 m x 1 m units, and get started on a third. Hopefully next week we will finish out the first level of our complete 2m x 2m unit. Once we finish this first level we will continue going down even further, and very soon will be beneath the topsoil layer. The dirt that was removed from the unit was put into a bucket and taken to a screen we had set up a short distance away. All the dirt was screened and any rocks or other material outside of vegetation that would not sift through the quarter inch mesh was bagged and kept. Our group found several smaller rocks, and even one prehistoric ceramic sherd: the first of what will hopefully be many interesting artifacts over the coming weeks. 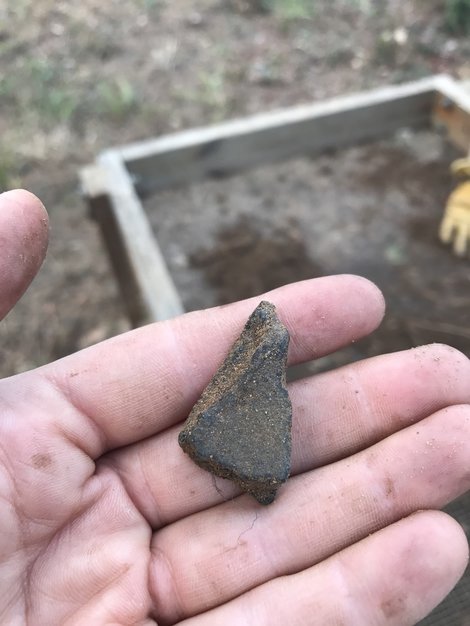 Pottery: our first prehistoric artifact! At the end of the day we took a quick look at the lower part of the site where one of our group was working with Jim Legg, an archaeologist from SCIAA. They had began to carve a unit out of the face of a shelf that had been dug out by a machine earlier, which resulted in the discovery of the site. Here you can see the stratigraphy, and what we will be eventually digging into in the units we worked on today. 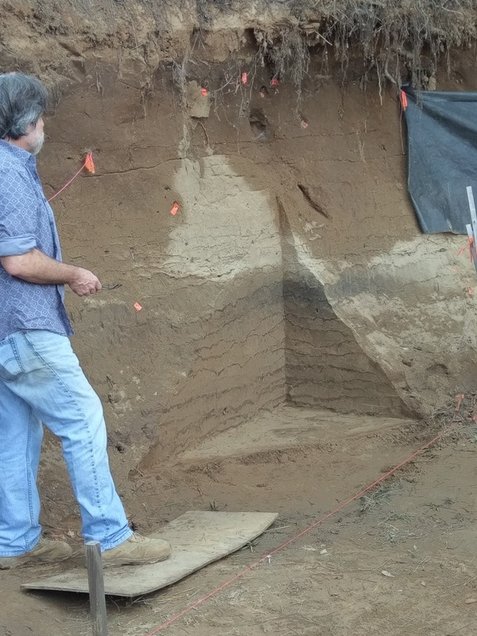 Stratigraphy exposed by machine cut. To end the day we cleaned up all of our tools, and put plastic over the units. The key, we were told, was to "not fight the water." So instead of stretching the plastic tightly over the top, we left plenty of give so that the water would fill up in the plastic and not leak into the units or pull the plastic (and the walls) down.
All in all, it was great second day out at the site, and I feel that we accomplished a good bit for it being the first time actually digging for most of us. Hopefully for the rest of the semester we will continue to have nice weather, and accomplish a lot. What is there to say about the first day at a dig site? Winter break was filled with anticipation for this field school. There was a swirl of thoughts in my mind of what to expect. I was not too much off the mark. It might be better to call the first day a pre-day, or a set-up day. Not to say that the day was not eventful. It was almost like spring cleaning except in the middle of winter. Although winter in South Carolina is more like fall or summer sometimes. So, the day was beautiful. We cleared things away such as foliage from the woodland floor, and any tree limbs that would impede our work in the future. This must seem like a no-brainer, but it had to be done before we could put down the excavation units. I helped set up a 2 meter by 1 meter unit, which took some trial and error for all involved. For most of us it was the first time at a site. 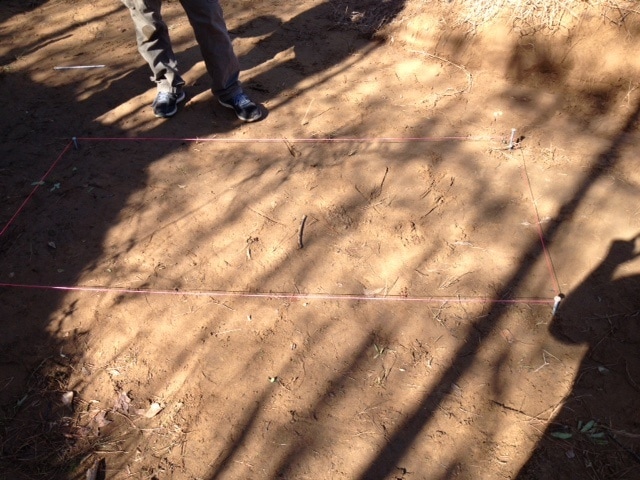 1 m x 2 m unit laid out (Unit 7). However, before the cleaning there was a big reveal of what already had been uncovered. Dr. White pulled the tarp up to reveal beautiful strata . . . and mice! There was also a frog in one of the other tarps, which honestly was my favorite part of the day. It reminded me of when I used to play in the creek as a child. We found many little creatures, but no artifacts of course. Like stated before this was a cleanup day. So, no actual digging. We were told that an Archaic artifact was found when the site was first discovered. It was even said that there was the potential for Clovis artifacts, which for me is very exciting.
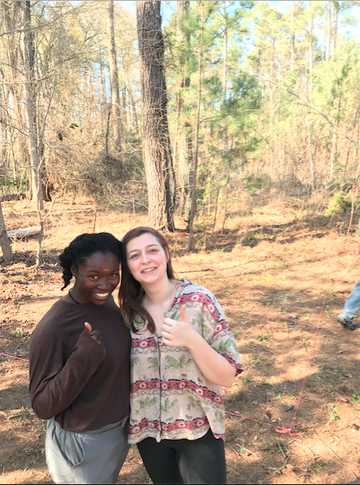 Thumbs up after completing our first day of field school. Thumbs up after completing our first day of field school. Growing up as girl who was always outside playing in the dirt and soaking up the sun, it was surprisingly easy to discover what my passion would be once I got through a few semesters of college. I came to the University of South Carolina as an undeclared student, not really sure what I was going to do with my life. That is until I took my first anthropology class and absolutely fell in love with the idea of being able to prolong my favorite childhood experiences by being outside and actually learning and discovering new ways to relive our prehistoric past. Archaeology is not for everyone, and honestly until I my first day of this class, I was not sure if it was for me. But, after experiencing the beginning stages of fieldwork and undergoing unfamiliar techniques, I am warming up to the idea of pursuing archaeology as my career path. Throughout this experience, I will be outlining my progression as an archaeology student and my involvement in fieldwork through these blog posts while also including what we are doing every day, how we are performing these tasks, and why we have chosen to perform this way. Before we could get down to the nuts and bolts of fieldwork, we had to meet up with the rest of our ten-person class. Our professor, Dr. Andy White, went over the syllabus in greater detail. Professor White started off by introducing the tools we were going to be using for our fourteen-day field experience. It was crucial that we came prepared our very first day with 5m measuring tape, a 2m folding ruler, a small transparent ruler, a mason’s trowel, and a mason’s line level. He provided us with a notebook, which is the most important tool we will have to utilize, and a Sharpie. We used all of these tools our first day of class, but we didn’t actually put the Mason’s trowel into use, we just had to get one edge nice and sharp by using an electric sharpener. In order to accurately understand how, what, and why were excavating in this particular area, you will have to visualize the site itself. The layout of the area could be described as having a centered driveway that is at an incline, and to the right of this driveway it flattens out revealing the second level of our site. At the bottom of the driveway, is the first level, and separating these to sites is a dirt wall that reveals very visible features, which we will also be excavating. Once we got to the location of the site, our first task was to clear the two levels of land that we will be excavating. In order to do this, we had to rake and cut down some underbrush. This land needed to be cleared of all leaves, pine straw, and any trees that were going to be problematic. After we completed this task, we had to pinpoint exactly where we were going to lay out our units. By using the Pythagorean theorem, we were to plot our points based off two existing points on the site grid. We laid out a 4 x 4 meter block on the upper level, and a 1 x 2 meter unit on the lower level. At first this task was very daunting because I have no background in archaeology, but once I could accurately visualize the site itself, I had no problem figuring out the math. After we got rid of all of the underbrush, plotted our units, and ate lunch, we had to get into pairs and draw out a visual representation of the site itself to scale. We did this by walking down a 50 meter tape and then walking back, all the while counting how many steps we took down and back. We took the two numbers, averaged them, divided 50 meters by the average step count in order to give us an accurate scale for how many meters each step we took accounted for. This way, we could draw and map out the site to scale and position every landmark to its specific location on paper. After we finished drawing our maps, six hours had passed and it was time to head back to campus. Although I quickly summed up the three main tasks of our first day of field school, the class itself was stretched out from 8 in the morning until 3:30 that day. While we learned how to properly map out our sites and visualize our projected areas from almost nothing, time flew by because everyone was very hands on and engaged in this amazing learning experience. On the first day of the archaeological field school being held at a site near the Broad River we arrived at the site at around 10:00 in the morning. On first observation there was a profile cut into a rise in the woods by a bulldozer in an attempt to collect sand. The wall was covered by a tarp and when the tarp was lifted to show us the profile there were several flags for artifacts spotted within the wall and also a fire pit that could clearly be distinguished. After we were taken around the entire site we got to work laying out what will later become the excavations. The class broke into teams of three and set about bolting together large sifting screens. Once we were finished with the sifting screens we got started clearing the upper portion of the site from brush and trees, mostly using rakes. While we were raking away the brush I found a small snake and picked it up to get it out of the way; everyone was enthralled by the snake and we proceeded to take a great deal of pictures. 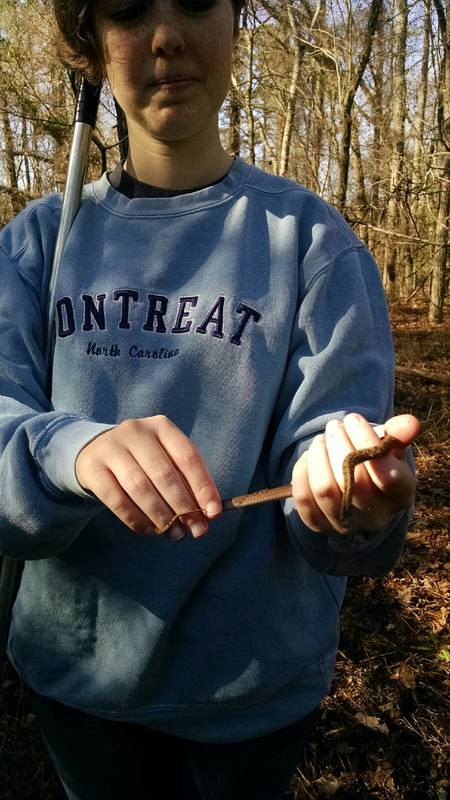 When we were finished clearing the brush away from the majority of the upper part of the site we broke for lunch.
After lunch we split into two groups; one that went to the upper portion of the site, on top of the profile wall, and one that went to the lower portion. I was with the group that was assigned to the top of the site. Once we were all grouped together, Dr. White showed us two permanent datum points which were at the positions of 1000 north/995 east and 994 north/995 east on the site grid (an arbitrary grid used to control excavations). These datum points, along with the ones at the bottom of the profile wall, will serve as the means to orient and map the entire site for the duration of the excavations there. We were given four other data points meant to form a 4-meter by 4-meter square that will serve as the starting points for our later units, or particular spaces that we excavate. In order to plot those points, we had to use the Pythagorean Theorem. We set up a point along the original line between the two datums and used it to calculate the hypotenuse of the triangle that these two points would form with the first point of the new square. We used this method in order to plot the most accurate points possible so that the excavation units would be oriented correctly and scientifically. From our first correct point (which took a great number of tries to place accurately), we calculated the other points in our square. We got the points wrong more often than we got them right but after quite a few tries we were able to put the nails where they were supposed to go and then to check them. Once our 4 x 4 square was finished, we used string to outline it and then put nails two meters along the lines of the square, connecting them in a cross to make the two by two squares that we will actually be excavating. That part was a lot easier than using math to find the original square. I can honestly say that this will probably be the only time that high-school geometry is directly relevant to my life. Meanwhile, while we were fighting with loose soil and wobbly nails, the group below the profile wall was setting up a 1-meter by 2-meter rectangle for their unit. Once we were all finished with our units we did some more brush clearing and tree cutting to move things away from the dig proper and to make room for the screens to be placed near all of the units. During the brush clearing we all also went to get our trowels sharpened to prepare for the actual digging that’s going to happen later. The last thing we did before leaving the site for the day was practice making site maps with our footsteps as a measuring tool. We walked all over the site and each group came up with their own labeled map. We left the site at around 3:00 for the day and will return to do more work in the field on Friday. |
Student Blog (2017)Blog posts written by the students of the 2017 Broad River Archaeological Field School Archives
April 2017
Categories
All
|
 RSS Feed
